Your Small Business Branding Checklist Before You Order Apparel
August 23, 2026
Your Small Business Branding Checklist Before You Order Apparel
Before you send a single order to production, you need six things locked down: production-ready artwork, your final garment selection, the decoration method, exact quantities with a size breakdown, an in-hands date, and one designated person who signs off on the final proof. Skip any of these and you’re gambling with your timeline, your budget, or both.
Here’s the fast version of a small business branding checklist for apparel orders:
- Artwork: vector files, correct color codes, fonts outlined
- Garments: style, fabric weight, and fit confirmed (sample if unsure)
- Decoration method: screen print, DTF, DTG, or embroidery chosen
- Quantities: final headcount with a size breakdown, plus a small buffer
- Timeline: in-hands date set, with an internal approval cutoff 48 to 72 hours before production
- Approver: one named person who signs off on the proof, not a committee
Jam4apparel runs in-house production for exactly this reason: when every one of these boxes is checked before the order lands, turnaround gets faster and the guesswork disappears. Start now by gathering your files and picking your internal deadline for who approves the final look.
Key Takeaways
A production-ready apparel order depends on locking artwork, garment specs, decoration method, quantities, and sign-off before anything goes into production.
| Point | Details |
|---|---|
| Artwork must be print-ready | Submit vector files with fonts outlined and provide PMS color codes, not screenshots from social media. |
| Match garment to use case | Choose fabric weight and fit based on whether it’s an event tee, staff uniform, or retail merch. |
| Pick decoration by quantity and art | Screen print suits larger runs, DTF handles small or full-color jobs, embroidery suits polos and hats. |
| Set a hard sizing deadline | Give responders 48 to 72 hours before production and order a small buffer in popular sizes. |
| Document proof approval | Assign one named approver and lock the timestamped sign-off before production starts. |
| Work with an in-house producer | Jam4apparel handles screen printing, embroidery, and DTF under one roof with digital mockups and fast turnaround. |
Table of Contents
- Small Business Branding Checklist: The Order Overview You Need First
- Artwork and File Prep: What Production Teams Actually Need
- Choosing Garments and Blanks That Match the Job
- Picking a Decoration Method That Fits Your Order
- How to Lower Your Per-Unit Cost Without Cutting Corners
- Nailing the Size Breakdown Without Chasing Stragglers
- Proofs, Samples, and Sign-Off: Locking the Final Spec
- Production Timeline, Shipping, and What to Check on Arrival
- Keeping Your Branding Consistent Across Every Piece
- Legal Checks Before You Print: Trademarks and Copyright
- What Jam4apparel Sees Go Wrong Most Often
- Let Jam4apparel Handle This Checklist for You
- Frequently Asked Questions
- Sources
Small Business Branding Checklist: The Order Overview You Need First
Every accurate quote starts with the same handful of specs. Vendors can’t price a job, and you can’t hold them to a deadline, until these are nailed down.
- Define the purpose. Is this a staff uniform, an event giveaway, a fundraiser, or retail merchandise? The use case shapes everything downstream, including garment choice.
- Set your final in-hands date and back into an internal approval deadline, ideally 48 to 72 hours before production starts, so a last-minute typo doesn’t blow your schedule.
- Decide on packing and distribution. Do you need individually bagged and labeled items for team distribution, or is a bulk pallet to one location fine?
- Lock your headcount. Will sizes come from a collected list per person, or a percentage split (say, 40% medium, 35% large)? Both work, but pick one before you request a quote, since a clear staged ordering process cuts lead-time risk significantly.
Artwork and File Prep: What Production Teams Actually Need
Nothing kills a timeline faster than artwork that isn’t production-ready. A logo screenshotted off your website will not print cleanly, no matter how good it looks on a monitor.
Send vector files whenever possible: .AI, .EPS, or a .PDF with fonts converted to outlines. If a raster file (like a .PNG or .JPG) is your only option, it needs to be at least 300 dpi at the actual print size, not just at thumbnail size. For anything color-critical, provide Pantone (PMS) codes or specific thread colors rather than just an RGB or CMYK value pulled from a screen. Screen colors shift depending on the monitor; PMS numbers don’t.
Embroidery adds another layer. Your art needs to be digitized into a stitch file, and fine details like thin lines or small text under a quarter inch often won’t stitch cleanly. Flag those early so your production team can simplify the design before it hits the machine.
Before you upload anything, run through this list:
- Fonts outlined, not linked
- Layers labeled and organized
- Artwork scaled to actual print size
- Transparent background where the design needs one
Pro Tip: Never submit a logo pulled from your social media profile or website header. Those are almost always low-resolution and will look pixelated or fuzzy once they’re blown up to shirt size.
Choosing Garments and Blanks That Match the Job
The blank you pick determines how the final piece feels, wears, and holds up, so match it to the actual use case rather than defaulting to “whatever’s cheapest.”
Group your needs by category first: event tees for a one-day 5K, polos for staff who wear them weekly, outerwear for cold-weather crews, performance fabric for a sports team, or hats and totes for giveaways. Each category has a different durability bar.
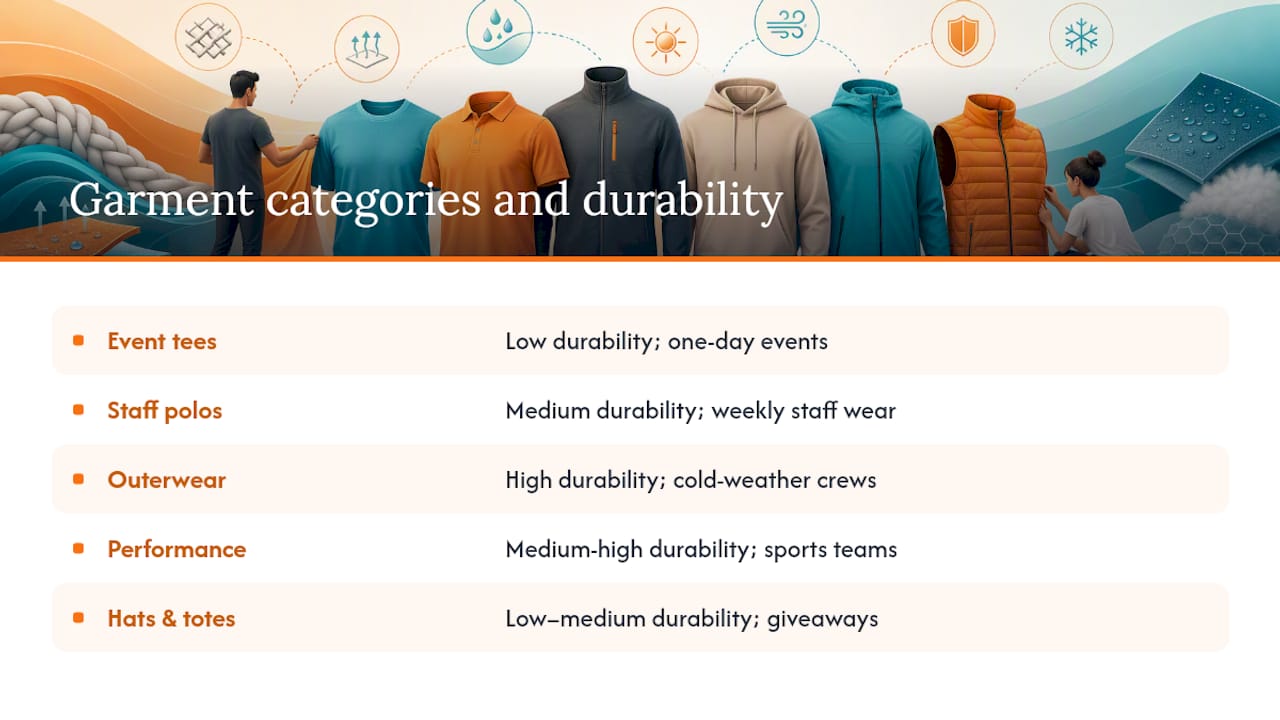
Fabric weight and fiber content matter more than most buyers expect. A heavier cotton blend holds screen print ink better and drapes with more structure, while a lighter poly blend suits performance wear but can behave differently under heat transfer. Retail-focused brands often lean toward a softer, more tailored blank for a premium hand feel, since blank selection materially affects the finished feel and durability of the piece.
If you’re ordering more than a hundred units of a style you’ve never touched, request a physical sample first. It’s a small cost against a large mistake.
Picking a Decoration Method That Fits Your Order
Your quantity, art complexity, and garment choice should decide the decoration method, not the other way around.
- Screen printing gets more cost-effective as your run grows, and setup is typically economical starting around two dozen pieces or more, since each color in your design requires its own screen. Fewer colors, cheaper setup.
- DTF and DTG work well for small runs, one-off pieces, or full-color photographic designs that would need a dozen screens to replicate. DTF transfers well onto varied blanks, including some fabrics screen print struggles with.
- Embroidery delivers a durable, premium look that’s standard for polos, jackets, and hats. It carries a one-time digitizing fee, and very fine detail can be tricky to stitch cleanly at small sizes.
- Combination orders are common. An embroidered logo on the chest paired with a screen-printed design on the back is a normal ask, not a special request.
Screen printing’s per-unit cost drop on larger runs comes down to one fact: setup fees for screens and digitizing are fixed costs that get divided across more pieces as your quantity climbs. Curious how DTF stacks up against traditional screen print on a real order? Jam4apparel’s DTF vs. screen printing comparison breaks down when each method actually wins.
How to Lower Your Per-Unit Cost Without Cutting Corners
Setup fees are the biggest lever most buyers ignore. Screen setup and embroidery digitizing are fixed costs charged once, so the more items you can run through that same setup, the lower your effective cost per piece. Consolidating a single design across shirts, hoodies, and tote bags in one order usually beats splitting it into three separate small orders.
A few other pricing mechanics worth knowing:
- Minimums vary by method. Screen printing typically wants a higher headcount to make sense; DTF has essentially no practical minimum.
- Tier pricing rewards both directions: fewer ink colors and higher total quantity both push your unit price down.
- Order a few extras in your most common sizes rather than the exact headcount. Reprinting five shirts later costs more than five extra shirts up front.
- Save your finalized tech pack. Reordering from an existing file is faster and often cheaper than starting a new setup from scratch.
Pro Tip: If you’re already ordering a run of tees, ask whether adding a small batch of hats or totes with the same logo can share the setup fee. It often can.
Nailing the Size Breakdown Without Chasing Stragglers
Size chasing eats more hours than any other part of this process. Fix it by setting a firm internal deadline, roughly 48 to 72 hours before your order needs to go into production, and communicating it clearly to everyone involved.
Give people one clean way to respond: a single shared sign-up form, an RSVP-by-date, or one point of contact who collects sizes and enters them into a master list. Three separate group texts asking for sizes is how orders get delayed.
Once responses are in, order a small buffer of extra units in your most commonly requested sizes, usually large and extra-large. Decide your policy for late responders before you place the order, not after someone emails you the day production starts. Options that work:
- “No response by the deadline means we order your normal size from last time.”
- “Late sizes go into the buffer stock, first come first served.”
- “Late requests get added to a second, smaller reorder.”
Pick one and stick to it.
Proofs, Samples, and Sign-Off: Locking the Final Spec
A digital mockup is where most mistakes get caught, so treat it like a real inspection, not a formality. Walk through it methodically.
- Check spelling and text on every line, especially names, dates, and event titles that get added last minute.
- Verify placement and scale. A logo that looks right on a flat mockup can sit differently on an actual garment’s curve or pocket.
- Compare colors against the actual garment, not just your screen. A navy shirt reads differently than a black one under the same ink.
- Request a physical sample if you’re using a new garment style, an unusual color combination, or if the order is large enough that a mistake would be costly, since physical pre-production samples are the standard safeguard for exactly those situations.
- Document sign-off with one named approver and a timestamp. Once that approval is in writing, production specs are locked, no last-minute “actually, can we move the logo” requests.
Production Timeline, Shipping, and What to Check on Arrival
A realistic timeline has three chunks: proofing time, actual production, and shipping. Compress any one of them and you’re the one absorbing the rush fee or the missed event date.
Decide early whether shipping or local pickup fits your distribution plan better. If you’re handing shirts out at a single event location, pickup often removes a layer of shipping risk entirely.
When the order arrives, don’t just sign for it and stack the boxes. Run a real receiving check:
- Count boxes against your packing slip before opening everything
- Spot-check sizes and quantities against your original order
- Photograph any defects immediately, before the items get worn or washed
- Report problems within the vendor’s stated claim window
A documented, quick report gets resolved faster than a phone call two weeks later, because a clear receiving checklist with photo evidence speeds up corrective action on both sides.
Keeping Your Branding Consistent Across Every Piece
A production checklist gets you a finished order. It doesn’t automatically get you a finished order that actually looks like your organization. That part takes a second pass before you approve anything.
Look at your logo placement, colors, and any tagline or slogan across every garment type in the order, not just the hero item. A logo that reads clean on a chest pocket can look cramped on a hat, or lose detail entirely when it’s scaled down for a sleeve. If your organization has an established color palette, don’t let a vendor’s “close enough” PMS substitution slide, since even a slightly warmer red can make a uniform order look mismatched next to older stock you already own.
Tone matters as much as color. A youth sports league and a law firm shouldn’t use the same graphic style, font weight, or slogan energy, even if they’re ordering the identical polo. If your brand voice is playful, a stiff corporate-style layout on the back of a shirt will feel off to anyone who’s seen your other materials. If it’s professional, an overly casual font choice undercuts that in a way people notice even if they can’t say why.
This is also where you decide whether every department, team, or location gets the exact same design, or a variation with a shared anchor element (same logo, different accent color per team, for example). Either approach works, but decide it deliberately rather than letting five separate order requests drift into five different looks. If you’re setting up initial brand assets from scratch, a resource like this branding checklist for building visual identity is worth a look before you finalize your first apparel order, since consistent visual identity choices made now save reprints later.
Legal Checks Before You Print: Trademarks and Copyright
Ordering apparel with someone else’s intellectual property on it, even accidentally, creates real exposure. This section isn’t legal advice, but it flags the questions worth asking before art goes to press.
If your design uses a sports team logo, a licensed character, a celebrity’s likeness, or another company’s registered mark, you generally need permission or a license, even for internal use like a company party shirt. “We’re not selling it” doesn’t automatically clear you; distribution to employees or the public can still count as use.
Stock graphics and fonts carry their own rules. A font downloaded for personal use may not be licensed for commercial printing, and a clip-art image pulled from a search engine often carries usage restrictions the search results don’t show you. Check the license terms before your design gets locked into a proof.
If you’re building a new logo or brand mark for your own organization, a basic trademark search is worth the time before you print hundreds of units with it. Discovering a naming conflict after your merch is already in circulation is a far more expensive problem than catching it beforehand.
None of this replaces an actual attorney’s review for anything high-stakes, like a product line you plan to sell publicly. But for routine orders, a quick gut check on where your art actually came from and whether you have the right to use it prevents most of the trouble before it starts.
What Jam4apparel Sees Go Wrong Most Often
The gap between a smooth order and a delayed one almost always traces back to two things: artwork that wasn’t production-ready, and an approval that dragged on past the internal deadline. In-house production and fast turnaround only help if the file coming in is actually usable and someone with authority signs off on time.
Most of the friction we see could have been caught with a five-minute check before submission, not a bigger production problem.
Let Jam4apparel Handle This Checklist for You
Running through every item on this list yourself takes real time, and one missed detail (an unoutlined font, a wrong PMS code, a size list that never got finalized) can cost you your in-hands date. Jam4apparel exists to take that load off your plate: our in-house production means screen printing, embroidery, and DTF all happen under one roof in Lake in the Hills, Illinois, with no outside vendor adding delay to your timeline.
Send us your artwork and garment picks, and we’ll build a digital mockup for your approval before anything touches production, with a physical sample available for larger or first-time orders. Browse screen printing options or embroidery services to see what fits your project, or check out apparel solutions organized by industry if you’re outfitting a school, team, or company. Ready to move forward? Request a quote and upload your files at Jam4apparel and we’ll get your mockup started.
Frequently Asked Questions
What should be on my small business branding checklist before ordering custom apparel? Confirm production-ready artwork, your chosen garments, the decoration method, final quantities with a size breakdown, an in-hands date, and one designated approver before you request a quote.
How far in advance should I set my internal approval deadline? Set it 48 to 72 hours before your production start date. That buffer gives you room to catch a typo or sizing issue without blowing your in-hands date.
Do I need a physical sample before placing a bulk order? Request one if you’re using a new garment style, an unusual color, or placing a large order where a mistake would be costly. A digital mockup catches most issues, but a physical sample catches fit and color problems a screen can’t show.
What file format works best for custom apparel artwork?
Vector files like .AI, .EPS, or a .PDF with fonts outlined are strongest for production. A high-resolution raster file at 300 dpi at actual print size works as a backup.
How do I decide between screen printing, DTF, and embroidery? Larger runs with fewer colors favor screen printing, small runs or full-color photographic art favor DTF or DTG, and polos or hats needing a premium, durable finish favor embroidery.
Sources
- Custom Apparel Ordering Playbook | Fresh Prints
- How to Order Custom T-Shirts: The Complete Guide (2026) – The Loyal Brand
- Custom Order Services | Gidi Apparel Group Houston
Recommended
Ready to print your design?
Screen print, embroidery, and DTF — no minimums on many styles.