What File Formats Do You Need to Send for Embroidery?
August 25, 2026
What File Formats Do You Need to Send for Embroidery?
Send a vector file. AI, EPS, or vector PDF format is what any embroidery digitizer wants first, because it converts cleanly into stitch data without the guesswork a blurry logo creates. If you don’t have one, a high-resolution PNG, TIFF, or JPG at 300 DPI or higher, at the actual size you want stitched, is a workable backup.
Here’s the short version before you attach anything to an email:
- Best: AI, EPS, vector PDF, or SVG. These scale to any size without losing detail.
- Acceptable fallback: PNG, TIFF, or JPG at 300 DPI or higher, ideally with a transparent background.
- Always include: intended size, placement (left chest, sleeve, back), garment color, and any Pantone references.
- Ask for a proof. A digitizer should confirm stitch layout before production starts.
If your file doesn’t check any of these boxes, Jam4apparel still has a path forward. Our team reviews submitted art and digitizes from vector or high-resolution raster files as part of our standard process.
Key Takeaways
Vector artwork (AI, EPS, or vector PDF) digitizes faster and cleaner than raster files, and Jam4apparel checks and fixes imperfect files before production starts.
| Point | Details |
|---|---|
| Send vector first | AI, EPS, or vector PDF files digitize cleanly and avoid the manual tracing raster art requires. |
| Raster needs 300 DPI minimum | PNG, TIFF, or JPG must hit 300 DPI or higher at the final stitched size, with PNG preferred for transparency. |
| Prep artwork before sending | Outline fonts, remove tiny details, convert strokes to fills, and supply exact placement sizes. |
| Include full order details | Pack size, placement, garment color, Pantone references, and approval contact with every submission. |
| Jam4apparel checks files for free | The embroidery team reviews, digitizes, and proofs artwork before running your order. |
Table of Contents
- Why Vector Artwork Matters and When Raster Files Will Work
- How to Prepare Artwork Specifically for Embroidery
- How to Send Your Files and What to Include With Your Order
- Common Problems That Cause Delays or Extra Charges
- How Jam4apparel Handles Your Files and the Proof Process
- Detailed Overview of Common Embroidery Artwork Preparation Formats
- Artwork Files vs. Embroidery Design Files: Two Different Jobs
- How Embroidery Machines Read Your Design Once It’s Digitized
- Choosing the Right Approach Based on Your Production Needs
- What Actually Slows Down Embroidery Orders (And What Doesn’t)
- Ready to Get Your Design Embroidered Right the First Time?
- Sources
Why Vector Artwork Matters and When Raster Files Will Work
A vector file stores your logo as math, lines and curves defined by equations, so it can be blown up to cover a jacket back or shrunk to fit a cap without a single jagged edge. A raster file (PNG, JPG, TIFF) is made of pixels, and pixels have a fixed count. Stretch a small JPG pulled off a website and you get a blocky, fuzzy mess that no digitizer wants to trace.
That distinction changes what happens on the production floor. When a digitizer works from vector art, they import clean paths directly into their software and map stitch types to those exact shapes. When they work from raster art, someone has to manually trace the outlines by eye first, a process that eats time and introduces small interpretation errors around thin lines or serif fonts.
- Vector in, clean digitizing out. The path data translates almost directly into stitch paths, avoiding the tracing step that eats hours and introduces artifacts in satin and fill stitches.
- Raster in, extra work required. A digitizer has to manually rebuild edges, which adds labor and, on many jobs, a recreation fee.
- Raster minimums that actually work. Vector files remain the best starting point, but if raster is all you have, it needs to be 300 DPI or higher measured at the final stitched size, not the size it happens to be on your screen.
Choose PNG over JPG when you’re stuck with raster. PNG supports transparency and holds edge detail that JPG compression tends to smear, especially around fine text or thin outlines.
The financial case for vector isn’t subtle. Industry analysis on uniform decoration shows vector submissions lead to far higher first-time approval rates than raster art, which directly cuts down on recreation fees and the back-and-forth that delays a school spirit wear order or a team uniform deadline. If you’re weighing embroidery against another decoration method for the same logo, our comparison of apparel decoration methods breaks down which artwork format each method needs.
How to Prepare Artwork Specifically for Embroidery
Embroidery isn’t printing. A design that looks sharp on a screen or a printed flyer can turn into a muddy blob once it’s rendered in thread, because thread has thickness and stitches have a minimum size a needle can physically produce. Preparing your file the right way before you send it saves a round of revisions later.
- Outline your fonts. Convert text to paths (outlines) in your design software, or send the font file along with your artwork. Without outlines, a missing font on the digitizer’s end can shift your entire layout.
- Cut the tiny details. Anything smaller than roughly 2 to 3 millimeters, thin serif flourishes, fine drop shadows, tiny badge text, tends to disappear or clog together once stitched. Simplify before you send it.
- Convert strokes to fills. Thin outlined strokes often don’t survive digitizing cleanly. Filled shapes translate to stitch paths far more reliably.
- Supply artwork at actual size. A logo meant for a 4 inch left chest placement should be built or scaled to that size in your file, not guessed at during production. Check our logo placement guide for standard sizing by garment location.
- Include Pantone or color references. “Navy” means different things on different screens. A Pantone number keeps your team colors consistent from batch to batch.
- Send two versions. A layered master file (AI or EPS) for the digitizer to work from, plus a flattened high-resolution PNG so everyone can quickly preview what the final design should look like.
Pro Tip: If your logo has a lot of fine detail, ask your digitizer for a quick stitch-count estimate before you approve the proof. A design with too many color changes or tiny elements often runs up embroidery costs fast, and it’s cheaper to simplify on paper than to redo a finished sample.
How to Send Your Files and What to Include With Your Order
A complete order packet moves through production without a single email asking “what size did you want this?” Here’s what belongs in it:
- The master vector file (AI, EPS, or vector PDF), plus a flattened PNG for quick reference.
- Placement and size notes for every location you’re decorating, left chest, sleeve, full back, along with the garment color it’s going on.
- Color references, ideally Pantone numbers, so thread matching stays consistent across reorders.
- Contact and approval details, meaning who signs off on the digitized proof before production starts.
If you’re sending multiple logos or multiple garment placements, zip the files together and name each one clearly, something like “TeamLogo_LeftChest_4in.ai” beats “logo_final_v2.ai” every time. A short README or note in the email body listing sizes and placements saves the production team a round of clarifying questions.
For small files, email works fine. For larger batches or full team stores with multiple designs, a shared drive link or upload portal keeps everything organized in one place; IPD Jet Ski Graphics’ artwork upload page is a solid example of how a clear upload checklist speeds up file intake. Always ask for a digitized proof before production, and confirm your expected turnaround up front so there are no surprises on delivery day.
Common Problems That Cause Delays or Extra Charges
Most embroidery delays trace back to one of a handful of repeat offenders, and they’re avoidable once you know what to watch for.
- Low-resolution raster files. A logo pulled from a website or a screenshot rarely meets the 300 DPI minimum, forcing a digitizer to guess at edges.
- Text set too small. Anything under roughly a quarter inch tall risks turning into an illegible blob of thread.
- Stray background artifacts. Leftover white boxes or compression noise around a logo can confuse the digitizing process.
- Heavy gradients. Embroidery renders in solid thread colors, so a smooth gradient has to be broken into discrete color bands, which adds time.
- Too many color changes. Every thread swap adds machine time and, often, cost.
The fix is usually straightforward: the digitizer simplifies the art, rebuilds missing vector paths by hand, or requests a physical stitch-out sample before committing to a full run. Vector files remain the best starting point for this process, and low-quality raster art is the single most common reason a job needs rework. For any order where color accuracy or fine detail really matters, a physical sample stitch-out before a bulk run is worth the small delay it adds, since it catches problems while they’re still cheap to fix.
How Jam4apparel Handles Your Files and the Proof Process
Not every customer has a designer on staff, and that’s fine. Jam4apparel runs an in-house digitizing and embroidery operation specifically so imperfect files don’t turn into a stalled order.
Here’s what happens after you submit your art:
- File review. Our team checks whether your logo is vector, high-resolution raster, or something that needs rebuilding.
- Digitizing. We digitize directly from clean vector files, or from high-resolution raster art when that’s all you have.
- Proof approval. You see a digitized proof before anything goes to production, so sizing, placement, and colors get confirmed up front.
- Sample stitch-out (on request). For larger or more detail-sensitive orders, we can produce a physical sample before running the full batch.
- Production. Once approved, your order moves into our production queue with the specs you signed off on.
This file-check service is free, and it’s the reason a school coordinator or a coach with zero design background can still place a clean embroidery order. Visit our custom embroidery services page to start a file check or request a quote.
Detailed Overview of Common Embroidery Artwork Preparation Formats
Once your artwork is digitized, the production side works with stitch files, but as the customer, your job is supplying clean artwork, and the format hierarchy there is simple and worth knowing by name.
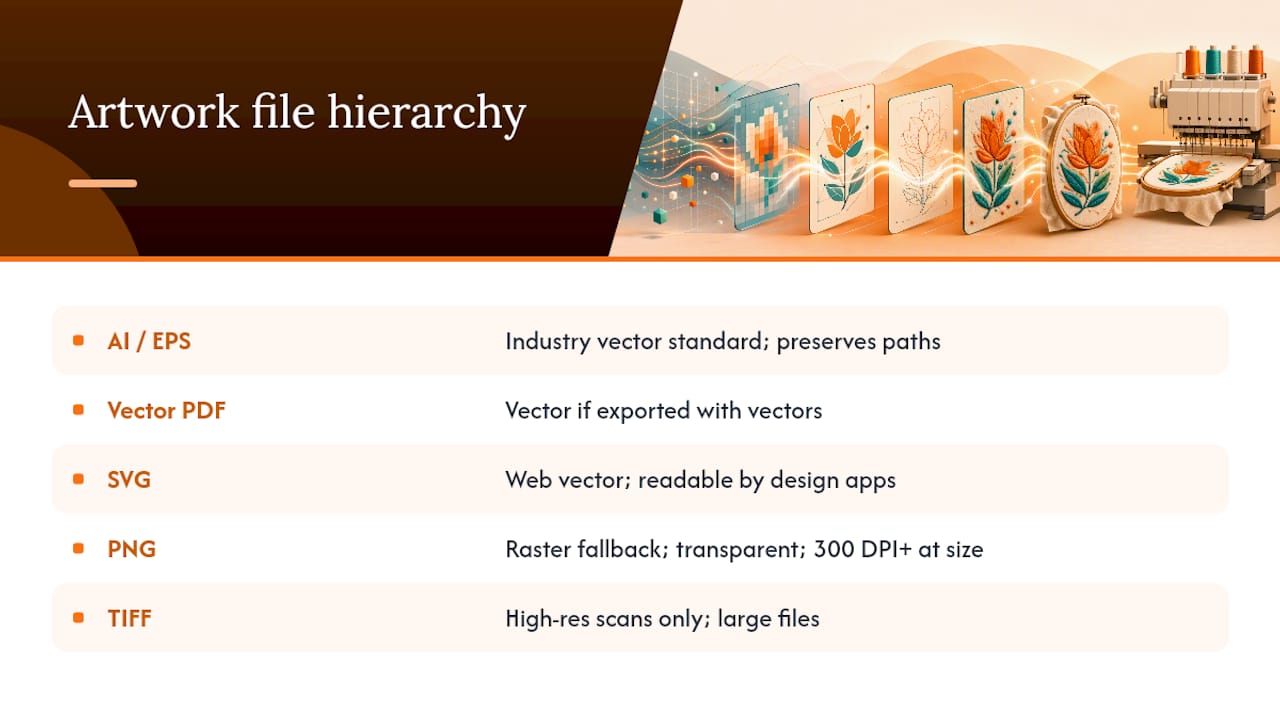
AI (Adobe Illustrator) and EPS are the industry standard for logo artwork across the entire apparel decoration business, not just embroidery. Both preserve vector paths, layers, and editable text, which is exactly what a digitizer needs to build accurate stitch outlines.
Vector PDF functions almost identically to AI or EPS as long as it was exported with vector data intact rather than flattened to an image during export, a common mistake when a PDF gets generated from a Word document or a slide deck.
SVG works well too, especially for logos built in web design tools, since it’s a vector format readable by most professional design software.
PNG is the strongest raster fallback specifically because it supports a transparent background and doesn’t compress away edge sharpness the way JPG does. If a PNG is all you have, make sure it’s built at 300 DPI or higher at your actual placement size, not resized up from something smaller.
TIFF is occasionally used for very high-resolution scans of physical artwork, but it produces large files and isn’t necessary unless you’re digitizing from a printed original.
Knowing this hierarchy before you send anything means fewer surprises when your digitizer emails back asking for a different file.
Artwork Files vs. Embroidery Design Files: Two Different Jobs
Your logo file and the digitized embroidery file that eventually runs through a machine are not the same thing, and mixing them up is one of the most common points of confusion for first-time apparel buyers.
Your artwork, the AI, EPS, or PNG you send, describes what your logo looks like. It has no information about stitch direction, stitch density, thread sequencing, or how a needle should move to recreate that shape in thread. That translation step, called digitizing, is a specialized skill that converts flat artwork into a set of machine instructions a commercial embroidery machine can actually run.
This is exactly why decorators handle digitizing in-house rather than asking customers to supply machine-ready stitch data themselves. Very few small business owners, coaches, or school coordinators have digitizing software, and even fewer have the training to use it well. Your job is supplying clean, accurate source artwork. The digitizer’s job is turning that artwork into something a machine can stitch correctly, choosing satin stitches for text, fill stitches for large areas, and running stitches for fine outlines.
Think of it like handing an architect a floor plan versus handing a construction crew rebar specifications. Both describe the same building, but they serve completely different stages of the process, and neither substitutes for the other.
How Embroidery Machines Read Your Design Once It’s Digitized
Once your artwork has been digitized, the resulting stitch file tells a commercial embroidery machine three things for every section of your design: where to place each stitch, what stitch type to use, and in what order and color sequence to sew it.
Different shapes call for different stitch types, and the digitizer makes those calls based on your original artwork. Small text and thin lines typically become satin stitches, dense parallel lines of thread that create a smooth, slightly raised finish. Large solid areas, like a filled letter or a broad logo shape, usually become fill stitches, a crisscross pattern that covers wide space efficiently. Thin outlines or fine detail lines often become running stitches, a simple back-and-forth line of thread.
This is precisely why the prep work described earlier in this article matters so much. A gradient in your original logo has to get broken into discrete color blocks because a machine can’t blend thread colors the way a printer blends ink. Text set too small forces a digitizer to either drop detail or risk a stitch density so tight the fabric puckers. Every simplification decision you make upfront, outlining fonts, removing tiny details, converting strokes to fills, directly shapes how clean the final stitched result looks. Order a sample stitch-out when the details matter, since Printify’s own prep guidance recommends exactly that step to catch how a design actually reads in thread before committing to a full production run.
Choosing the Right Approach Based on Your Production Needs
The “best” file format ultimately depends less on your preference and more on what your decorator’s equipment and workflow can handle efficiently, which is why the safest move is always sending the cleanest source artwork you have and letting the digitizer make the technical calls.
For standard garment embroidery, staying with vector artwork gives your digitizer the most flexibility regardless of the specific machine running the job. Commercial embroidery equipment varies by shop, but the input side of the process, the artwork you supply, stays consistent across nearly every setup. That’s good news for you: you don’t need to know anything about a specific machine’s capabilities. You just need to hand over clean vector art or a properly sized high-resolution raster file.
Specialty techniques change the calculation slightly. 3D or puff embroidery, which uses foam backing to create a raised effect, generally needs simpler designs with fewer fine details, since the foam adds thickness that swallows intricate elements. Check our puff embroidery page if you’re considering that look for a logo or mascot. Embroidered patches carry their own sizing and border considerations separate from direct garment embroidery, since a patch has to be cut and applied as a separate step; High Class Tackle Co.'s embroidered patch line shows how patch-specific design constraints differ from a direct chest logo. If you’re deciding between decoration methods altogether, our breakdown of screen printing versus embroidery covers which artwork format each approach actually needs.
What Actually Slows Down Embroidery Orders (And What Doesn’t)
Most advice on embroidery artwork focuses on format names, send a vector, avoid a JPG, without explaining why some “acceptable” files still cause problems. The real predictor of a smooth order isn’t the file extension. It’s whether the artwork was built at the size and complexity embroidery actually allows.
A perfectly valid EPS file with eight gradient blends and hairline text will cause just as much back and forth as a low-resolution JPG. Format is a floor, not a guarantee. The conventional checklist stops at “send a vector file,” but the buyers who get clean proofs on the first try are the ones who also simplified their design before sending it, outlined the fonts, and gave a real Pantone reference instead of a color name.
If there’s one thing school coordinators and team buyers consistently underestimate, it’s how much a five-minute conversation with a digitizer before submission saves compared to fixing a rejected proof after the fact. Sending imperfect art isn’t a dealbreaker. It just means the file-check step, the one most buyers skip past, is doing the heavy lifting that good prep would have handled for free.
— Adam
Ready to Get Your Design Embroidered Right the First Time?
Jam4apparel handles the part most apparel companies push back onto you: fixing artwork that isn’t quite production ready. Send us your logo, vector, PNG, whatever you’ve got, and our team checks it, digitizes it if it needs digitizing, and sends you a proof before anything hits the embroidery machine.
That file check is free, and it applies whether you’re ordering a dozen polos for a small office or outfitting an entire school’s spirit wear program. If you want a physical stitch-out before committing to a bulk run, we can produce a sample so you see exactly how your logo looks in thread, not just on a screen. Our embroidery services page has everything you need to get started, and if your order spans multiple decoration methods or a full team store, our industry-specific solutions page covers programs built for schools, sports teams, and growing businesses. Upload your artwork today and get a free proof back before you commit to a full production run.
Sources
- Vector vs. Raster: Why Your JPG is Ruining Your Embroidery - Digitizing & Vector Art Company
- What File Types Are Best for Embroidery? Formats Explained
- Uniforms
Recommended
Ready to print your design?
Screen print, embroidery, and DTF — no minimums on many styles.